Share
Pin
Tweet
Send
Share
Send
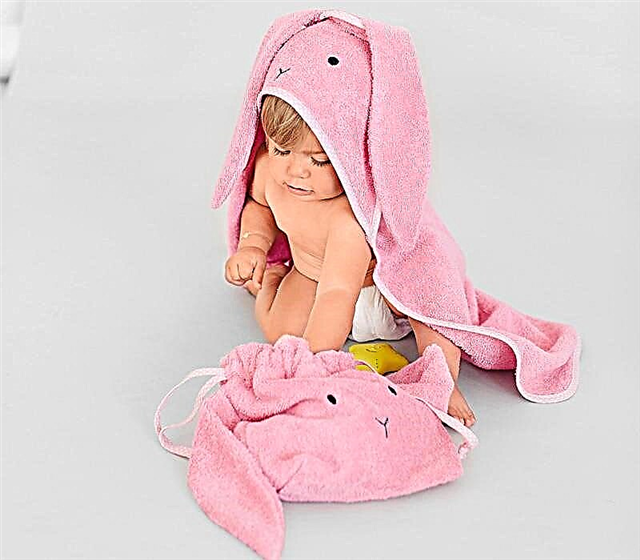
Well, is not this lovely terry bunny with long ears on the hood! It can be used as a towel and bathrobe at the same time. And all the toys fit in a bag-bag of the same design.
A hood with bunny ears and a muzzle is very simple to carry out.
 The format of the eyelet pattern is A4; all dimensions in the drawing are in centimeters
You will need:
- pink terry cloth;
- a flap of black cotton;
- flizofiks;
- finished slanting inlay of pink color;
- pink, white and black threads for sewing;
- self-disappearing marker;
- tailor pins;
- scissors;
- ruler;
- tape measure

Step 1
To carve: the main part of the towel (round corners) 1x; hood triangle 1x; eye (including 1 cm allowance) 4x. Cut two circles for the eyes with a diameter of approx. 1.5 cm in black cotton and non-woven fabric.Step 2
Chip the two parts of the ears and grind them with the front sides along the outer sections, leaving the open sections below for turning out. Cut the seam allowances to a width of 2 mm and twist.Step 3
Duplicate a black cotton fabric flizofiksom and cut out the eyes. Place them on the details of the hood, iron and stitch in a zigzag stitch.Step 4
Using a self-disappearing marker, draw the nose in the form of Y and embroider it with a dense zigzag stitch.Step 5
Turn the longitudinal (lower) section of the hood part with an oblique trim.How to sew an oblique edging: 3 ways
Step 6
Pin the hood to the main part and stitch it at a distance of 5 mm.Step 7
Pin the ears on both sides of the corner of the hood from the side of the main part and stitch them at a distance of 5 mm.Step 8
Cut the slices with an oblique trim around the entire perimeter.Step 9

To iron both ears up and to sew on a seam of attaching a slanting inlay.
DIY baby blanket
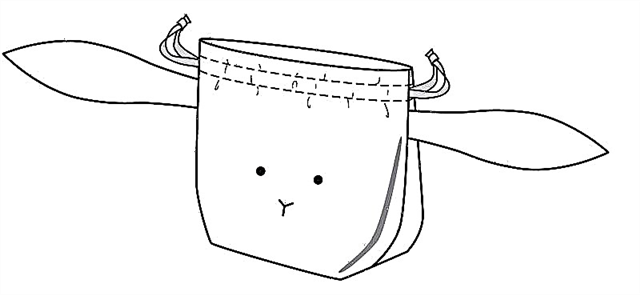
Bag-bag is not only funny, but also very practical. Thanks to the drawstring with ties at the upper edge, nothing will fall out of it.
You will need:
- pink terry cloth;
- finished slanting inlay of pink color;
- a flap of black cotton;
- pink, white and black threads for sewing;
- self-disappearing marker;
- safety pin;
- tailor pins;
- scissors;
- ruler;
- tape measure
Step 1
To carve out: a detail of a bag 2x; ears 4x.Step 2
The eyes and nose should be performed as described in steps 3 and 4 for the towel.Step 3
Ears to perform as described in step 2.Step 4
Side sections of bag parts are marked on the overlock. Chip the side sections and, departing from the upper section by 11 cm, fix the ears between them. Make side seams, leaving each hole with a length of approx. 2 cm for drawstring.Step 5
Iron out the allowances of the side seams, grind allowances along the cuts at the holes.Step 6
Sew bottom sections together and grind.Step 7
Give the bag a shape.To do this, fold the corner on each side, aligning the side seam with the seam of the bottom, and stitch it by laying a line perpendicular to the seams 12 cm long.Step 8
Fill the upper section of the bag with an oblique inlay, then iron the edge on the wrong side by 6 cm and sew it up, laying two parallel lines at a distance of 2 and 4 cm from the fold.Step 9

For one tie, a slanting collar with a length of approx. Fold 90 cm lengthwise in half, iron and stitch on both sides. Use a safety pin to draw into the drawstring (one eyelet on the left and the other on the right). Tie knots at the ends of the ties.
We sew a children's hat from knitwear: a master class
Source and photo: Burda. Baby
Material prepared by Julia Dekanova
Share
Pin
Tweet
Send
Share
Send